Mom’s Melt-In-Your-Mouth Dinner Rolls Recipe
Hey there, fellow foodies! I’m excited to share with you my mom’s melt-in-your-mouth dinner rolls recipe. These rolls are the perfect addition to any meal and will leave you wanting more. Trust me, I grew up with these rolls and they are a staple in my family’s kitchen.
There’s nothing quite like the smell of fresh bread baking in the oven, and these rolls will fill your kitchen with that heavenly scent. Not only do they taste amazing, but they are also easy to make with just a few simple ingredients.
In this recipe, we’ll be using flour, eggs, salt, sugar, margarine, milk, baking powder, and yeast to create the perfect soft and fluffy dinner rolls. So, put on your apron, preheat your oven, and let’s get started!
Why You’ll Love This Recipe
If you’re a bread lover, you’re going to fall in love with my Mom’s Melt-In-Your-Mouth Dinner Rolls Recipe. These rolls are the epitome of perfection, and once you try them, you won’t want to go back to store-bought rolls ever again.
What makes these rolls so special? For starters, they’re incredibly soft and fluffy. They melt in your mouth, leaving behind a buttery, melt-in-your-mouth sensation that’s hard to resist. The combination of flour, eggs, margarine, and milk gives these rolls their signature texture, making them the best homemade dinner rolls you’ll ever taste.
Moreover, the recipe is very easy to follow, and you won’t need any special equipment to make them. With just a few basic ingredients and some patience, you can have these rolls on your dinner table in no time.
And the best part? You can customize the recipe to suit your taste. Whether you want to make them sweeter or less sweet, you can adjust the amount of sugar to your liking. You can also try adding some cinnamon or raisins to the dough to make cinnamon rolls or experiment with different shapes and sizes.
Overall, these Mom’s Melt-In-Your-Mouth Dinner Rolls are the perfect addition to any meal, from Thanksgiving dinner to a simple weeknight meal. They’re versatile, delicious, and easy to make, and once you try them, you’ll understand why they’re so popular. So what are you waiting for? Give this recipe a try, and you won’t be disappointed.
Ingredient List
Let’s start by gathering all the ingredients we need to make these Mom’s Melt-in-Your-Mouth Dinner Rolls. This bread recipe requires simple pantry staples that you might already have in your kitchen. You will need:
- 2 cups warm water (about 110°F)
- 1/3 cup sugar
- 1/4 cup margarine or butter, melted
- 1 tablespoon active dry yeast
- 2 teaspoons salt
- 2 eggs, lightly beaten
- 6 to 6 1/2 cups all-purpose flour
- 1/4 cup milk
- 1/2 teaspoon baking powder
I highly recommend using fresh ingredients for the best result. Make sure your yeast isn’t expired, and your flour is fresh. You can also use low-cholesterol margarine or butter and skim milk to make this recipe healthier.
The Recipe How-To
Now, let’s dive into the recipe itself. Here’s how to make my Mom’s Melt-In-Your-Mouth Dinner Rolls Recipe:
Ingredients:
- 2 cups warm water
- 1/3 cup sugar
- 1/4 cup margarine
- 1 tablespoon salt
- 2 eggs
- 1/3 cup dry milk
- 6 cups flour
- 2 tablespoons baking powder
- 2 tablespoons active dry yeast
Instructions:
- In a bowl of a stand mixer, dissolve 2 tablespoons of active dry yeast and 1 tablespoon of sugar into 1 cup of warm water. Let it sit for 5 minutes until the mixture becomes bubbly and foamy.
- Then, add 1/3 cup of sugar, 1/4 cup of melted margarine, 1 tablespoon of salt, 2 eggs, and 1/3 cup of dry milk. Mix well with a whisk or a wooden spoon.
- Add 6 cups of flour, 1 cup at a time, mixing until the dough comes together.
- Add 2 tablespoons of baking powder and mix again for 30 seconds until the dough is smooth and elastic.
- Place the dough in a greased bowl and cover it with a damp towel. Let it rise in a warm place for 30 minutes.
- Punch down the dough and divide it into 24 equal pieces. Roll each piece into a ball and place them in a greased 9×13-inch baking dish.
- Cover the dish with a damp towel and let the dough rise again for 20 minutes.
- Preheat the oven to 350°F (175°C) and bake the rolls for 20-25 minutes until they are golden brown.
- Brush them with melted butter as soon as they come out of the oven.
Small bowl instructions:
You can also proof the yeast in a small bowl before adding it to the stand mixer. In a small bowl, mix together 1/3 cup of warm water, 1 tablespoon of sugar, and 2 1/4 teaspoons of active dry yeast. Let it sit for 5-10 minutes until the mixture becomes frothy.
These homemade dinner rolls are perfect for any occasion. Serve them warm with butter or use them to make sandwiches or sliders. You can also try variations by adding different herbs or grated cheese to the dough. These rolls are so good, they’ll become a staple in your household.
Substitutions and Variations
If you want to switch things up a bit, there are a few substitutions and variations you can try with this recipe. Here are some suggestions:
– Flour: You can use all-purpose flour or bread flour in this recipe, depending on what you have on hand. Bread flour will give you a slightly chewier texture, while all-purpose flour will be a bit softer.
– Milk: If you’re looking for a lower-fat option, you can use skim milk or 1% milk instead of whole milk. You can also use almond milk or soy milk if you want a dairy-free version.
– Margarine: While we love the buttery taste of margarine in this recipe, you can also use butter or vegetable oil if you prefer.
– Sugar: If you like your dinner rolls a bit sweeter, you can increase the amount of sugar in the recipe. Just be careful not to add too much, or the rolls will be too sweet.
– Yeast: If you don’t have active dry yeast, you can use instant yeast instead. Just follow the instructions on the packet for how much to use.
– Flavorings: If you want to add some extra flavor to your dinner rolls, you can try adding some herbs or spices to the dough. Rosemary or thyme would be delicious, or you could try adding some garlic powder or onion powder.
– Shape: While we love the classic dinner roll shape, you can also try shaping the dough into other shapes, like crescents or knots. Or, you could even try making cinnamon rolls with this dough!
Whatever substitutions or variations you choose, just make sure to follow the instructions carefully and adjust the baking time as needed. With a little creativity, you can make these dinner rolls your own!
Serving and Pairing
These melt-in-your-mouth dinner rolls are so versatile that they can be served with almost any meal. They are perfect for a family dinner, holiday feast, or even a summer barbecue. These rolls are so soft and fluffy that they will complement any dish on your menu.
If you’re serving a classic meal like roasted turkey or ham, these dinner rolls are the perfect accompaniment. They will act as a tasty side dish and will soak up any delicious gravy or sauce you have on the table. If you’re serving a hearty soup or stew, these dinner rolls will make the perfect addition to your meal. You can also serve them with pasta, meatloaf, or any other comfort food you love.
These dinner rolls can also be paired with an elegant dinner. If you’re serving a steak or seafood dish, these rolls will add a touch of homeliness to your plate. These rolls are so soft and buttery that they will complement any dish perfectly. They can also be served with a salad, making it a complete and satisfying meal.
If you’re looking for a sweet treat, you can also serve these dinner rolls with jam or honey. They will satisfy your sweet tooth and provide a perfect balance to the savory flavor of the dinner rolls.
No matter what you choose to serve these dinner rolls with, they will be a crowd-pleaser. These rolls are so delicious that they can be eaten on their own, and they will still be the star of the meal. So, don’t hesitate to make a big batch of these melt-in-your-mouth dinner rolls and let them shine on your dinner table.
Make-Ahead, Storing and Reheating
One of the best things about these Mom’s Melt-In-Your-Mouth Dinner Rolls is that you can make them ahead of time and store them for later. If you’re planning to make these rolls ahead of time, simply allow them to cool completely after baking, then store them in an airtight container at room temperature for up to two days.
If you want to store them for longer, you can also freeze them. Just wrap them tightly in plastic wrap or aluminum foil and place them in a freezer-safe container. They can be stored in the freezer for up to three months. When you’re ready to eat them, just remove them from the freezer and allow them to thaw for a few hours at room temperature.
When it’s time to reheat the rolls, you have a few options. If you’re in a hurry, you can use the microwave. Just place the rolls on a microwave-safe plate and heat them for 10-15 seconds, or until they are warm. However, if you want to preserve their soft and buttery texture, it’s best to reheat them in the oven.
To reheat in the oven, preheat your oven to 350°F. Then, place the rolls on a baking sheet and brush them with melted butter or margarine. Once the oven is preheated, bake the rolls for 5-10 minutes, or until they are heated through. Be careful not to overbake them, as they can become dry and tough.
Overall, these dinner rolls are perfect for making ahead of time and storing for later. They freeze well, reheat easily, and still taste just as delicious as when they were fresh out of the oven. So go ahead and make a big batch of these melt-in-your-mouth dinner rolls, and enjoy them all week long!
Tips for Perfect Results
Here are some tips to help you achieve perfect results when making Mom’s Melt-In-Your-Mouth Dinner Rolls:
1. Use high-quality ingredients: The quality of the ingredients you use will directly impact the taste and texture of your rolls. Use fresh flour, eggs, salt, sugar, margarine, milk, and baking powder.
2. Use warm water: Warm water is essential to activate the yeast. Make sure the water is between 110-115°F. If it’s too cold, the yeast won’t activate, and if it’s too hot, it will kill the yeast.
3. Add sugar to the warm water: Adding sugar to the warm water will help activate the yeast and give the rolls a slightly sweet taste.
4. Use a stand mixer: Using a stand mixer will make the process easier and more efficient. The mixer will knead the dough evenly and save you time and energy.
5. Let the dough rise twice: Letting the dough rise twice will give it the perfect texture and flavor. The first rise should be for about an hour, and the second rise should be for about 30 minutes.
6. Brush the rolls with melted butter before baking: Brushing the rolls with melted butter before baking will make them buttery and delicious.
7. Bake the rolls in a baking dish: Baking the rolls in a baking dish will help them rise evenly and prevent them from flattening out.
8. Let the rolls cool before serving: Letting the rolls cool for a few minutes before serving will help them hold their shape and prevent them from falling apart.
By following these tips, you can make the best homemade dinner rolls that are soft, fluffy, and melt-in-your-mouth delicious.
FAQ
Before we wrap up this recipe article, let’s take a look at some frequently asked questions about Mom’s Melt-In-Your-Mouth Dinner Rolls Recipe. These questions will help you troubleshoot any issues you might encounter while making this recipe and ensure that your dinner rolls turn out perfectly every time. So, let’s dive in!
Why are my dinner rolls not light and fluffy?
If you’re struggling to get your dinner rolls to come out fluffy and light, there are a few common mistakes that could be the culprit. One possibility is that you may have used too much flour or only used bread flour. Another potential issue is that you didn’t allow your dough enough time to rise and fully proof before baking, resulting in dense, heavy rolls.
Do you brush rolls with butter before or after baking?
One technique that can be used to add flavor and promote browning to rolls is butter basting. This involves brushing the rolls with butter either before, during, or after baking. While it may not result in as much browning as an egg wash, it still provides a lot of flavor. As a chef, I highly recommend giving butter basting a try for your next batch of rolls.
What do you brush dinner rolls with before baking?
Alright, folks, we’re almost ready to enjoy some delicious rolls fresh out of the oven. But before we get to that, there’s one important step we need to take – brushing the rolls with some melted butter. This will give the rolls a little extra richness and flavor, making them even more irresistible.
Now, when it comes to baking these rolls, we need to keep a close eye on them. They have a tendency to brown quite quickly, thanks to the generous amount of honey we’ve added to the recipe. So, set a timer for 15 to 25 minutes, but don’t just walk away and forget about them. Instead, be vigilant and check on them every few minutes to make sure they’re not getting too brown on top. We want them to be a beautiful golden brown, not burnt to a crisp.
How do you make store-bought rolls taste homemade?
There are some easy and delicious ways to enhance the flavour of store-bought dinner rolls. For instance, you can add a sprinkle of herbs or salt over the warmed rolls to give them an extra kick. Another trick is to drizzle some olive oil over them to give them a touch of Mediterranean taste. This simple hack can make a big difference in the overall taste of your rolls.
Bottom Line
:
In conclusion, I highly recommend trying out my Mom’s Melt-In-Your-Mouth Dinner Rolls recipe. With its simple ingredients and easy-to-follow instructions, you’ll be able to create the best homemade dinner rolls that are soft, fluffy and melt in your mouth.
Not only are these dinner rolls perfect for any occasion, but they’re also versatile and can be paired with a variety of dishes. Plus, the recipe can be easily adapted to suit your preferences and dietary needs.
So, whether you’re a home chef or a beginner baker, this recipe is sure to impress your family and friends. Give it a try and experience the satisfaction of baking your own delicious dinner rolls from scratch.
Thank you for reading this article and I hope you enjoy making these Mom’s Melt-In-Your-Mouth Dinner Rolls as much as my family and I do. Happy baking!
Mom’s Melt-In-Your-Mouth Dinner Rolls Recipe

My mom made these rolls for every occasion I can remember. They are originally in a little cookbook by Beverly Nye from Cleveland, Ohio. They are practically no fail, since there is no kneading involved. They are always light, tender, and delicious, and so popular that I usually plan on at least two per person rather than the one indicated here. They are also really convenient since you make the dough the night before and refrigerate it for the first rise. The times indicated do not include refrigerating overnight or the 2 hours they take to raise before baking. (P.S. Thanks for the photo Danielle)
- 1 (1/4 ounce) package yeast
- 1/2 cup warm water
- 1 tablespoon sugar
- 1 teaspoon baking powder
- 1 cup milk
- 1/3 cup margarine
- 1/3 cup sugar
- 1 dash salt
- 2 eggs, beaten
- 4 1/2 cups flour
- Dissolve yeast in warm water and add 1 tablespoon sugar and baking powder. Allow to stand for 20 minutes.
- Meanwhile scald milk. Add margarine, 1/3 cup sugar and salt. Cool a little and then add eggs. (I do this step in my 4 c glass measure in the microwave.).
- Combine all with flour. Cover and refrigerate overnight. (The dough will more than double in bulk, so make sure your container is big enough. If it looks like it might outgrow its bowl, you can always punch it down once or twice without any ill effects.).
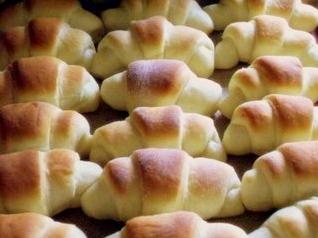
- Two hours before serving, divide dough into thirds and roll out into large circles about 9 inches in diameter on a floured surface. The dough will be sticky, but don’t worry. It will quickly come together and handle really well with a few sprinklings of flour (not too much). Cut into 8 wedges and make crescent rolls by starting at the wide end and rolling up. Place on greased pans to rise, covered with clean towels.
- Bake at 425 degrees for 8-10 minutes. Mom always rubbed the hot rolls with a stick of butter when they came out of the oven, and I do, too. It makes them so beautiful.
[custom-related-posts title=”Recommended Recipes Just For You” none_text=”None found” order_by=”date” order=”ASC”]