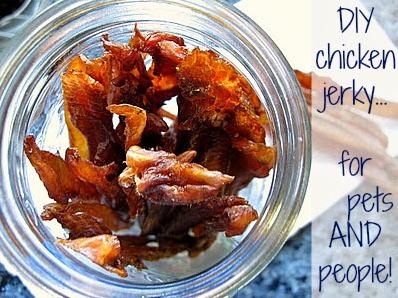
Tom’s Oven Made Hot Pepper Chicken Jerky Recipe
Welcome to my kitchen, where I’m about to share with you the recipe for my delicious Tom’s Oven Made Hot Pepper Chicken Jerky. This recipe is a game-changer for chicken lovers everywhere, and I’m thrilled to share it with you.
Making jerky can be a time-consuming process, but with this recipe, you can easily make chicken jerky at home in your oven. The recipe is simple, and the results are nothing short of fantastic. My recipe is perfect for those who love a little heat in their jerky, and I guarantee that you’ll be hooked after trying it.
My love for jerky started with beef jerky, but as a chef, I always look for new ways to experiment with flavors and ingredients. That’s why I started making chicken jerky, and this particular recipe has become a favorite among my family and friends.
So, let’s get started on this delicious journey to making the best chicken jerky you’ve ever tasted. Get your apron on, take out your oven mitts, and let’s begin!
Why You’ll Love This Recipe
Looking for a new snack to satisfy your cravings? Look no further than Tom’s Oven Made Hot Pepper Chicken Jerky Recipe! This recipe is perfect for anyone who loves a little spice in their life, and it’s easy to make right in your own kitchen. Trust me, once you try this recipe, you won’t be able to get enough of it.
One of the best things about this recipe is that it’s made with boneless, skinless chicken breast instead of beef. Not only is chicken a healthier option, but it also has a milder flavor that allows the spices to really shine. Plus, with this recipe, you can make chicken jerky just as delicious as beef jerky.
Speaking of spices, this recipe is packed full of them. From garlic powder to cayenne pepper, each bite of this chicken jerky is bursting with flavor. And if you’re a fan of heat, the crushed red pepper flakes and cayenne pepper will definitely give you a kick.
But what really sets this recipe apart is the use of pickling salt. This type of salt is perfect for curing the chicken, giving it that classic jerky texture. And with the addition of brown sugar and Worcestershire sauce, you’ll get a balance of sweet and savory that is truly addictive.
So why should you try this recipe? It’s simple: because it’s the best chicken jerky recipe out there. With its bold flavors, tender texture, and easy preparation, you’ll never go back to store-bought jerky again. So fire up your oven, gather your ingredients, and get ready to make the best chicken jerky of your life.
Ingredient List
Before we get into the recipe how-to, let’s make sure we have all the ingredients on hand. Here’s what you’ll need to make Tom’s Oven Made Hot Pepper Chicken Jerky Recipe:
Ingredients:
- 1 lb Boneless, skinless chicken breast
- 1/4 cup Soy sauce
- 1/4 cup Worcestershire sauce
- 1/4 cup Brown sugar
- 2 tsp Cayenne pepper
- 1 tsp Crushed red pepper flakes
- 1 tsp Onion powder
- 1 tsp Garlic powder
- 1 tsp Black pepper
- 1 tsp White pepper
- 1 tsp Pickling salt
These ingredients are easy to find and will give you the best chicken jerky you’ve ever tasted. If you can’t find pickling salt, you can use regular salt instead. The combination of soy sauce, Worcestershire sauce, and brown sugar is perfect for marinating the chicken and giving it a sweet and savory flavor. The cayenne pepper, crushed red pepper flakes, and white pepper add a nice kick of heat.
The Recipe How-To
Now, let’s get to the fun part – making the chicken jerky! Follow these steps to make the best chicken jerky you’ve ever had:
Instructions
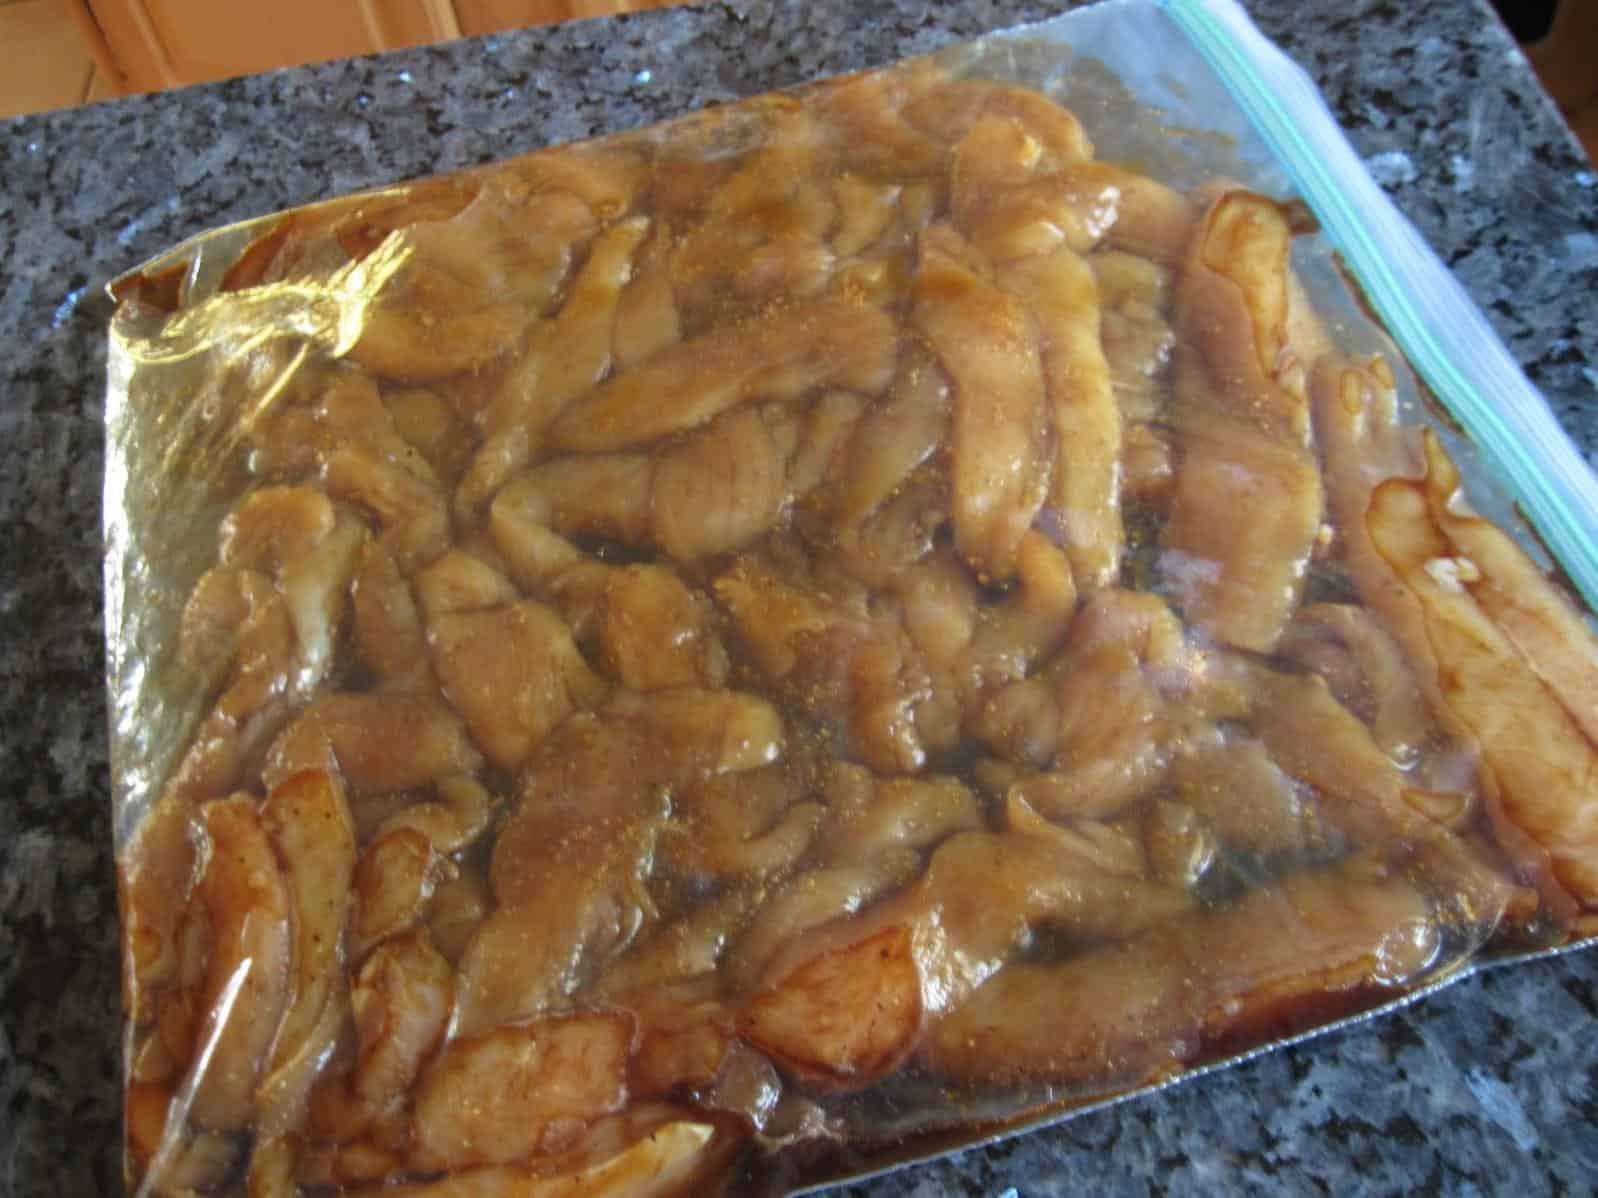
- In a large bowl, combine all the ingredients except for the chicken. Mix well to make the marinade.
- Add the sliced chicken to the marinade and toss to coat. Cover the bowl with cling wrap and refrigerate for at least 4 hours or overnight.
- Preheat the oven to 175°F or the lowest setting possible.
- Line a baking sheet with aluminum foil or parchment paper. Place a wire rack on top of the baking sheet.
- Take the chicken out of the marinade and pat dry with paper towels. Discard the marinade.
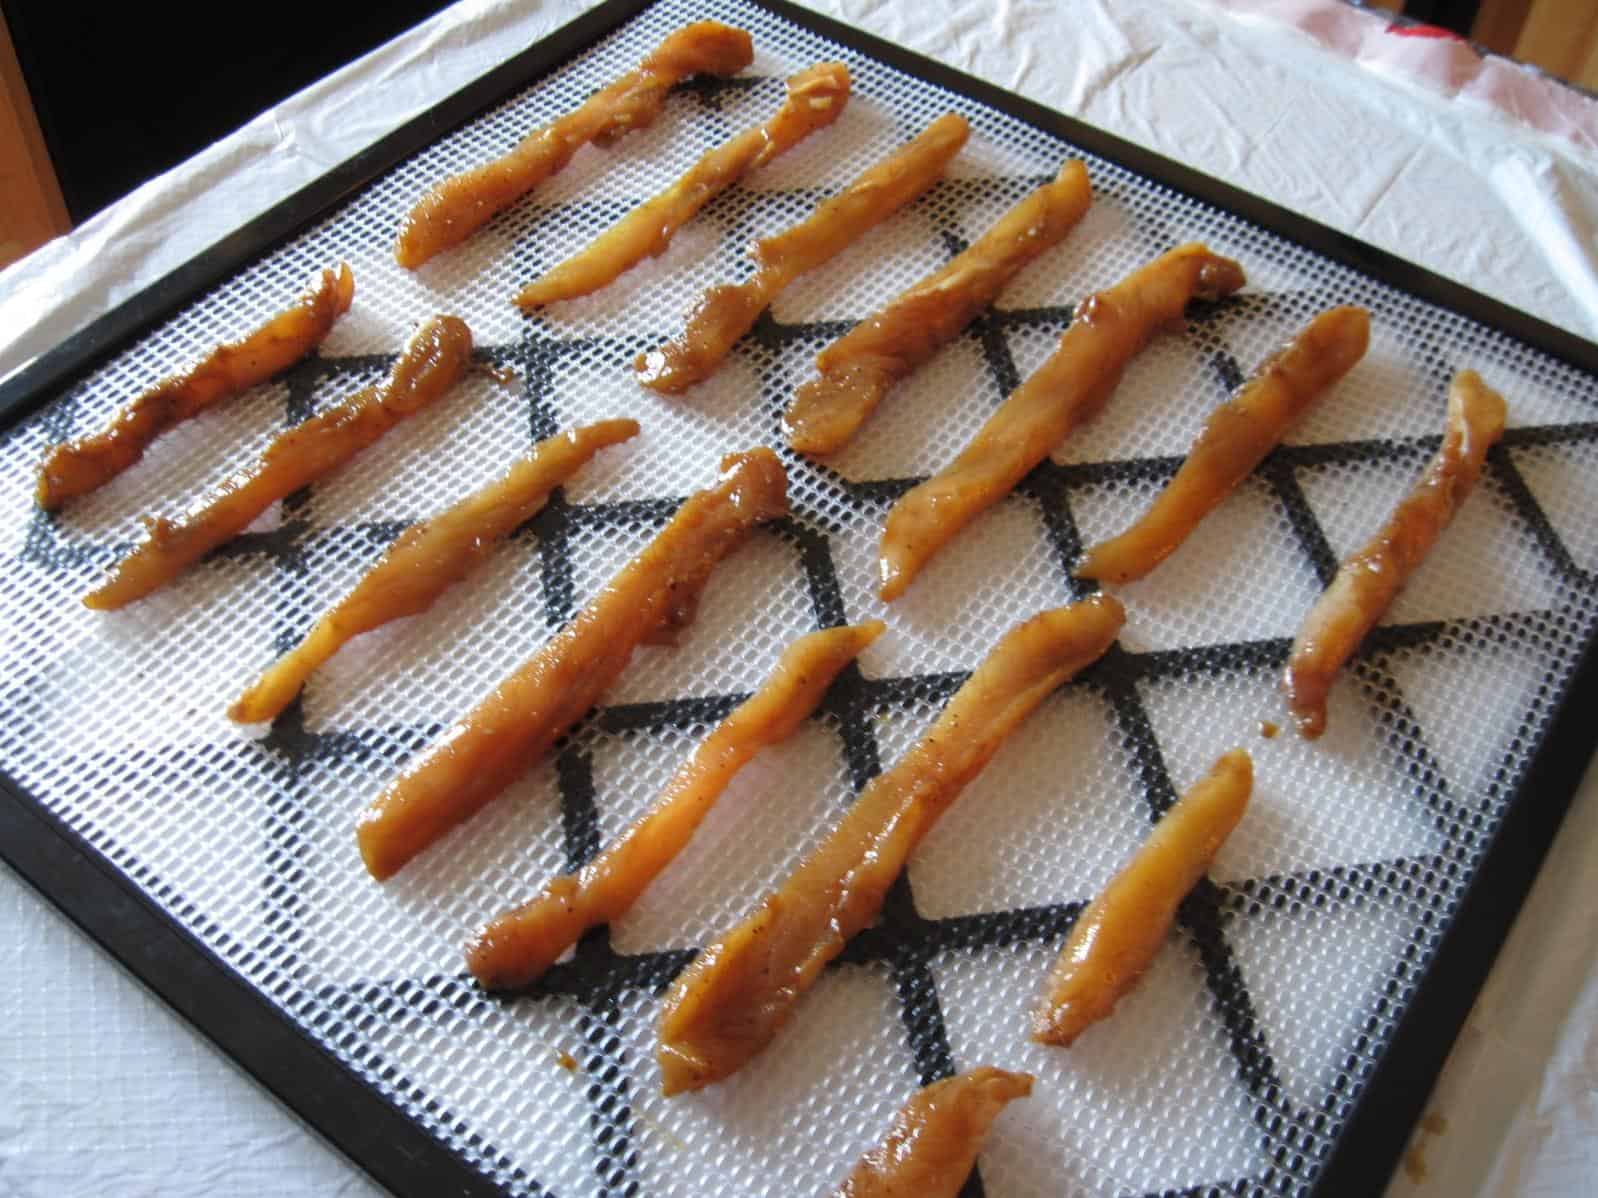
- Arrange the chicken strips on the wire rack, making sure they do not touch each other.
- Bake the chicken for 3-4 hours, or until it is dried out and chewy. Check the chicken every hour to make sure it is not overcooked or burnt.
- Once the chicken is done, remove it from the oven and let it cool completely on the wire rack.
- Store the chicken jerky in an airtight container in the refrigerator for up to 2 weeks.
Tips
- Slice the chicken against the grain to make it more tender.
- You can use chicken thighs instead of breast if you prefer.
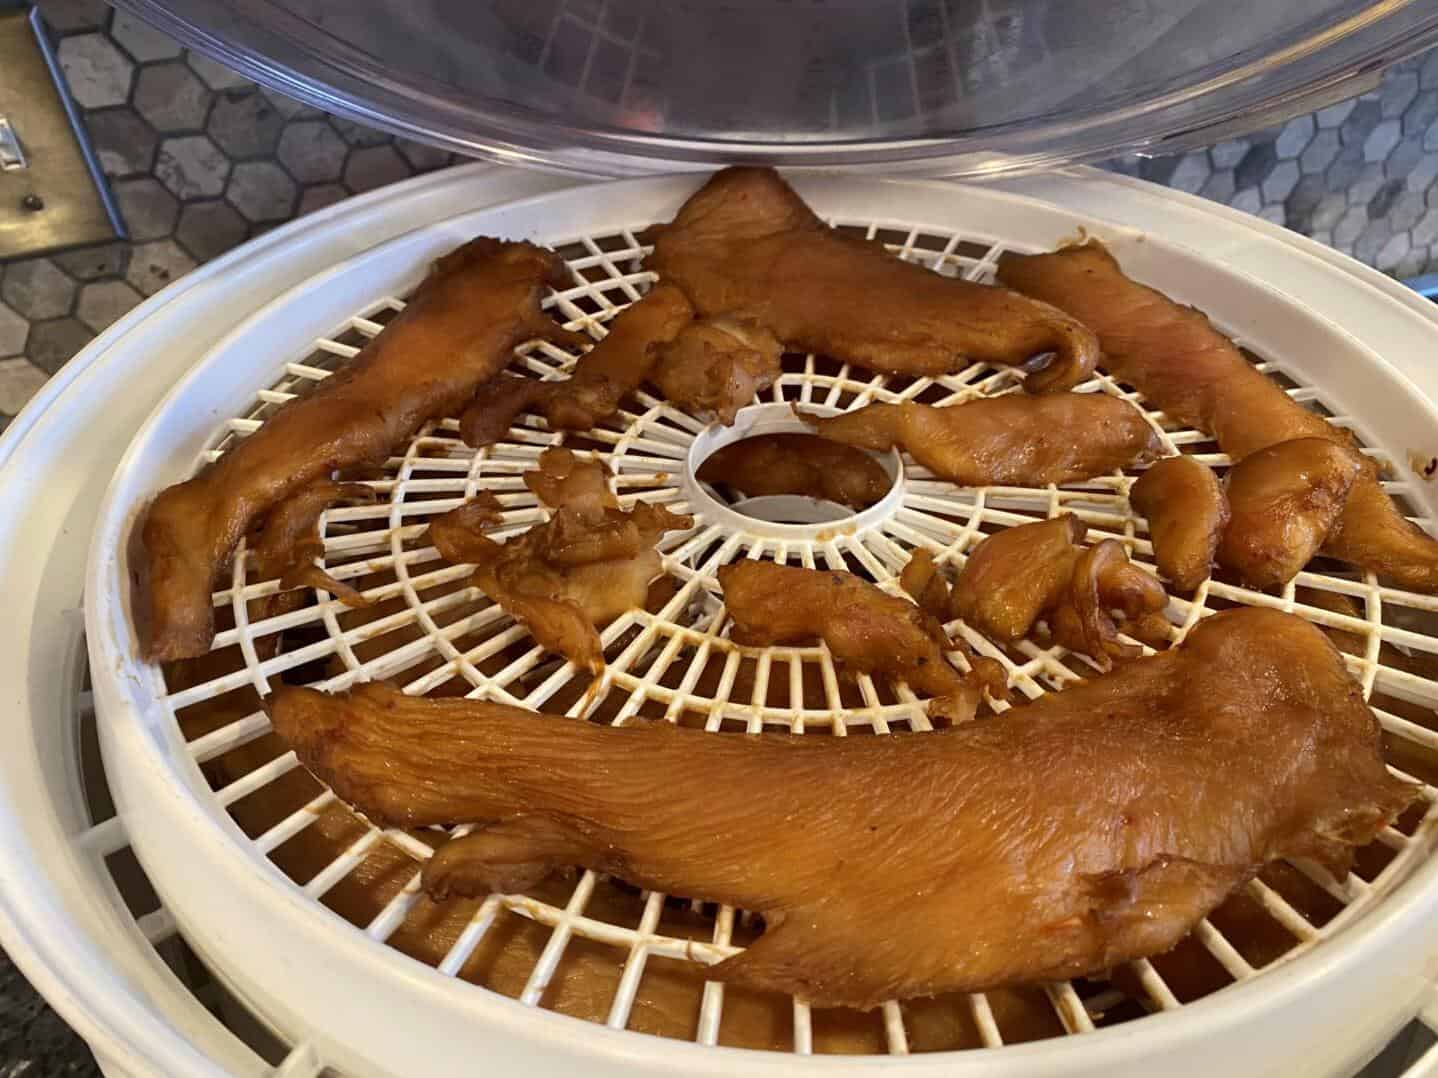
- If you have a dehydrator, you can use it to make chicken jerky too. Follow the manufacturer’s instructions for drying time and temperature.
- To make spicy chicken jerky, add more cayenne pepper or crushed red pepper flakes to the marinade.
- You can also experiment with different marinade flavors, such as lemon pepper, cajun, or teriyaki.
With these easy steps, you can create a delicious and healthy snack that is perfect for on-the-go or as a treat for your furry friend. Enjoy making this tasty chicken jerky recipe in your own kitchen!
Substitutions and Variations
There are a variety of substitutions and variations you can make to this hot pepper chicken jerky recipe to make it your own. Here are some ideas to get you started:
– Instead of boneless skinless chicken breast, try using chicken thighs for a juicier and more flavorful jerky.
– If you don’t have a dehydrator or oven, you can still make chicken jerky by using a smoker or a jerky gun.
– If you prefer a milder version of this recipe, reduce the amount of cayenne pepper, crushed red pepper flakes, and black pepper.
– For a different flavor profile, try making cajun chicken jerky by using cajun seasoning instead of the hot pepper blend.
– You can also experiment with different types of meat, such as beef or even dried fish, to create your own unique jerky recipe.
– If you want to add some extra veggies to your jerky, try marinating thinly sliced chicken wings and bell peppers together for a tasty and healthy snack.
– If you’re feeling adventurous, you can even try freezing your chicken before slicing it to create a chewier texture similar to dried beef.
Remember, the possibilities are endless when it comes to making homemade jerky. Don’t be afraid to get creative and try new things to find your perfect recipe.
Serving and Pairing
Now that you have made the mouth-watering Toms Oven Made Hot Pepper Chicken Jerky Recipe, it’s time to figure out how to serve and pair it. One great thing about chicken jerky is that it can be served in many different ways.
If you’re looking for a quick and easy snack, simply grab a few pieces of the jerky and enjoy it as is. The spicy kick of the cayenne pepper and crushed red pepper flakes will awaken your taste buds and leave you wanting more.
Another way to enjoy the chicken jerky is to pair it with some fresh veggies like bell peppers or carrots. This will add a fresh crunch to the dish and balance out the heat from the jerky.
For those who like it spicy, try serving the chicken jerky alongside some spicy beef or chicken wings. The flavors will complement each other and make for a deliciously fiery meal.
If you’re looking for a more substantial meal, try adding the chicken jerky to a salad or wrap. The protein from the chicken will keep you full and satisfied, while the spicy flavor will add a kick to your meal.
As for drink pairings, a cold beer or a glass of iced tea would be a perfect match. The refreshing drinks will help cool down the heat from the jerky and enhance its flavor.
Overall, the Toms Oven Made Hot Pepper Chicken Jerky Recipe is a versatile dish that can be served in many different ways. Experiment with different pairings and find what works best for you.
Make-Ahead, Storing and Reheating

Once you have made this delicious hot pepper chicken jerky, you may want to store it for later use. The good news is that this chicken jerky recipe stores well and can be enjoyed for up to a month if stored properly.
To store the chicken jerky, let it cool completely before placing it in an airtight container or a resealable plastic bag. Make sure to remove any excess air from the bag or container to prevent moisture from forming inside. Store the chicken jerky in a dry, cool, and dark place like a pantry or cupboard.
If you prefer to make this chicken jerky recipe ahead of time, you can do so by following the recipe, letting the jerky cool, and then storing it as described. This makes for a great snack to have on hand or to take with you on the go.
To reheat the chicken jerky, simply place it in a preheated oven at 350°F for about 5-7 minutes. Alternatively, you can reheat it in a microwave oven for about 10-15 seconds. However, keep in mind that reheating the jerky can cause it to lose some of its texture and flavor.
When reheating, be sure to monitor the chicken jerky closely to avoid overcooking it. Overcooked jerky can become tough and chewy.
By following these storage and reheating tips, you can enjoy this delicious hot pepper chicken jerky recipe whenever you want. Whether you make it ahead of time or store it after making, this recipe is sure to be a hit with anyone who loves a little spice in their life.
Tips for Perfect Results

Now that you have the Toms Oven Made Hot Pepper Chicken Jerky Recipe, it’s time to ensure that you get the perfect results. Here are some tips to help you make the best chicken jerky you’ve ever tasted.
Firstly, it’s important to use the right cut of meat. Boneless, skinless chicken breast is the best chicken cut for making jerky. It’s low in fat and has a tender texture that works well for jerky. You can also use chicken thighs if you prefer a slightly fattier jerky.
When mixing your marinade, be sure to use the correct ratio of salt to soy sauce. Too much salt will dry out the chicken and make it too tough to chew. On the other hand, too little salt will not preserve the chicken properly. A ratio of 1:2 salt to soy sauce works best.
Next, let the chicken marinate in the fridge for at least 2 hours to allow the flavors to permeate the meat. You can also leave it to marinate overnight for a stronger flavor.
When it’s time to cook the chicken jerky, it’s important to slice the chicken thinly and evenly. This ensures that the jerky dries evenly and at the same rate. Use a sharp knife or a meat slicer if you have one.
If you’re using an oven to make the chicken jerky, preheat it to 175°F (80°C) and use a wire rack to allow air circulation around the chicken. This helps to dry out the chicken evenly and prevent it from sticking to the pan.
It’s also important to flip the chicken jerky halfway through the cooking process to ensure that both sides dry evenly. This helps to prevent any damp spots that could cause bacteria to grow.
Lastly, be sure to store the chicken jerky properly. Keep it in an airtight container or a resealable bag in the fridge for up to 2 weeks. If you’re making a large batch, you can freeze it for up to 3 months.
By following these tips, you’ll be able to make the best Toms Oven Made Hot Pepper Chicken Jerky Recipe that you and your family will love.
Bottom Line
In conclusion, making Toms Oven Made Hot Pepper Chicken Jerky is an excellent way to satisfy your craving for a spicy and savory snack. This chicken jerky recipe is not only delicious but also easy to make, and it can be customized to your preferences. You can adjust the level of spiciness by adding more or less cayenne pepper or crushed red pepper flakes, and you can also experiment with different marinades and seasonings.
Whether you are a fan of beef jerky or looking for a healthier alternative, Toms Oven Made Hot Pepper Chicken Jerky is a must-try recipe. It is packed with protein and low in fat, making it a perfect snack for any time of the day. Plus, you can make it ahead of time and store it in an airtight container for up to two weeks, so it’s always ready when you need it.
Overall, this chicken jerky recipe is a crowd-pleaser that is sure to impress your friends and family. So, what are you waiting for? Grab some boneless skinless chicken breast, whip up some marinade, and let your oven do the rest. Trust me; your taste buds will thank you for it!
Toms Oven Made Hot Pepper Chicken Jerky Recipe

An easy alternative to smoking jerky, this makes a great snack for road trips, fishing trips, or just for snacking. A healthy snack as well. Can use turkey and venison as well. SIDE NOTE: THIS IS A VERY HOT JERKY.
- 1 lb boneless skinless chicken breast (turkey breast and venison works well also)
- 2 1/4 teaspoons tenderizing salt (e.g. Mortons Tenderquick)
- 2 1/4 teaspoons pickling salt
- 1 teaspoon crushed red pepper flakes
- 1/2 teaspoon cayenne pepper
- 1/4 teaspoon white pepper
- 1/4 teaspoon black pepper
- 1/8 teaspoon garlic powder
- 1/8 teaspoon onion powder
Optional
- 1 -2 pinch of crushed dehydrated habanero chili pepper flakes, if you can find them only make this is you really like hot and spicy beef jerky (optional)
- Mix the salts, peppers, garlic powder and onion powder together and put into a salt shaker with large holes to allow the red pepper flakes to get through; set aside.
- Preheat oven to 150°F.
- Cut chicken into 1/8th inch strips or 1/8th inch cubes (thickness doesn’t have to be exact, can be a little thicker).
- On a cutting board, sprinkle each strip evenly and heavily then with a meat mallet, rolling pin or pan, pound mixture into chicken. Turn chicken over and repeat.
- Place strips in single layer on a oven-safe metal cookie cooling rack (fine mesh or closely spaced bars work best).
- Cook chicken until dry but not brittle, 4 to 5 hours, rearranging once.
- Cooking times for turkey or venison are the same.
- Refrigerate for storage.