Delicious Marbled Rye Recipe for Bread Lovers
Welcome to my kitchen! I’m excited to share with you my recipe for Marbled Rye Bread. This is a classic bread that’s perfect for sandwiches, toast, or even just snacking on its own. The combination of light and dark rye doughs rolled together creates a beautiful, marbled effect that’s sure to impress.
Baking bread is a magical experience. There’s something about the smell of fresh bread wafting through the house that just makes everything feel right. And when it comes to Marbled Rye, the aroma of caraway seeds and molasses will fill your home and make your mouth water. Trust me, this bread is worth the effort.
I’ve been baking bread for years, and Marbled Rye is one of my all-time favorites. It’s a bread that’s been around for centuries, and for good reason. The combination of flavors and textures is just perfect. So, if you’re ready to roll up your sleeves and get started, let’s dive in!
Why You’ll Love This Recipe
As a chef, I can confidently say that my Marbled Rye recipe is one of the best bread recipes you will ever try. The combination of dark and light rye dough, beautifully rolled together to create a stunning marbled effect, will make your taste buds dance with joy.
But let’s not just talk about the aesthetics of this bread, let’s discuss the taste. The dark rye dough is made with cocoa powder, molasses, and caraway seeds, giving it a rich and complex flavor that will leave you wanting more. The light rye dough, on the other hand, is made with bread flour and has a slightly sweeter taste that balances out the darker dough.
The texture of this bread is also something to marvel at. The rye flour gives the dough a slightly denser texture, making it perfect for toasting and using as sandwich bread. It’s the ideal bread for a classic Reuben sandwich, but you can also enjoy it with a simple smear of butter or cream cheese.
But what really sets this recipe apart is the fact that it’s not made in a bread machine. While bread machines can be convenient, there’s something special about making bread by hand. The process of kneading the dough and watching it rise is therapeutic and rewarding, and the end result is a loaf of bread that you can truly be proud of.
So, why will you love this recipe? Because it’s a delicious, visually stunning bread that’s made with care and attention. It’s the perfect addition to any meal, and it’s sure to impress anyone who tries it. So go ahead, give it a try, and experience the joy of homemade bread.
Ingredient List
Before jumping into the recipe, let’s gather all the ingredients we need to make this delicious Marbled Rye Bread. Don’t worry, everything listed here can be easily found at your local grocery store.
Here’s what you’ll need:
- Water: You’ll need water for the dough and the cocoa mixture.
- Cocoa powder: For the chocolate dough.
- Shortening: It helps to keep the bread soft and moist.
- Molasses: Provides a sweet and distinct flavor to the bread.
- Caraway seeds: These seeds are a must-have for any traditional rye bread.
- Instant yeast: You’ll need this to leaven the bread.
- Salt: Enhances the flavor of the bread.
- Bread flour: It has a higher protein content than all-purpose flour, which helps to develop gluten in the dough.
- Rye flour: A must-have for any rye dough.
- Wheat flour: Adds structure to the bread and enhances the flavor.
With these ingredients on hand, we are ready to start making our Marbled Rye Bread.
The Recipe How-To
Mixing the Dough
- Combine 1 1/2 cups of warm water, 2 tablespoons of molasses, 2 tablespoons of shortening, 2 tablespoons of caraway seeds, 2 teaspoons of instant yeast, 1 1/2 teaspoons of salt, and 2 cups of bread flour in a bowl.
- Beat the mixture until it’s smooth.
- Stir in 2 cups of rye flour and 1 cup of bread flour.
- Knead the dough on a lightly floured surface for 8-10 minutes until it’s smooth and elastic.
- Place the dough in a greased bowl, turning once to grease the top.
- Cover the bowl with plastic wrap and let it rise in a warm place until it doubles in size, which takes about 1 hour.
Dividing and Rolling the Dough
- Punch the dough down and divide it into 2 equal pieces.
- Roll each piece into a rectangle on a floured surface.
- Brush one rectangle with water and sprinkle it with cocoa powder.
- Place the second rectangle on top and press it down lightly.
- Roll the rectangles together into a loaf shape.
Second Rise and Baking
- Place the loaf in a greased 9×5-inch loaf pan.
- Cover the pan and let the loaf rise again until it doubles in size, which takes about 30 minutes.
- Preheat the oven to 375°F.
- Bake the loaf for 35-40 minutes or until it’s golden brown and sounds hollow when tapped.
- Cool the loaf in the pan for 10 minutes before removing it to a wire rack to cool completely.
Slice and Enjoy!
Once the marbled rye loaf has cooled down, you can slice it and enjoy it on its own or use it for a classic Reuben sandwich. This bread is perfect for any sandwich because of its soft and chewy texture.
Substitutions and Variations
One of the best things about baking is that you can always experiment with different ingredients and flavors to create a unique twist on a classic recipe. Here are some substitutions and variations that you can try with this marbled rye bread recipe:
– Flour: Instead of using all-purpose or bread flour, you can use whole wheat flour or a combination of rye and wheat flour for a heartier bread. Keep in mind that the texture and rise of the bread may be slightly different.
– Caraway Seeds: If you don’t like the taste of caraway seeds, you can omit them or substitute with fennel or anise seeds for a similar flavor profile.
– Cocoa Powder: The cocoa powder in this recipe gives the bread its signature marbled effect. However, if you don’t have cocoa powder, you can use instant coffee or espresso powder instead for a different twist.
– Molasses: Molasses adds a touch of sweetness and depth of flavor to the bread. If you don’t have molasses, you can substitute with honey, maple syrup or brown sugar.
– Shortening: You can use butter or vegetable oil instead of shortening. Keep in mind that the texture and flavor of the bread may be slightly different.
– Swirl Bread: If you want a more pronounced marbled effect, you can roll the light and dark dough together instead of just layering them. This will create a more dramatic swirl pattern.
– Sandwich Bread: You can use this recipe to make a sandwich bread by shaping the dough into a loaf instead of a round shape. The bread will still have the same delicious flavor and texture that makes it perfect for a Reuben sandwich.
These are just a few ideas to get you started, but don’t be afraid to get creative and come up with your own variations. The possibilities are endless with this delicious marbled rye bread recipe.
Serving and Pairing
Marbled rye bread is a versatile bread that pairs well with many different types of dishes. Its unique flavor and beautiful marbled appearance make it a great addition to any meal.
One classic pairing for marbled rye bread is with a classic reuben sandwich. The combination of the tangy sauerkraut and corned beef with the slightly sweet and nutty flavor of the rye bread is a match made in heaven.
Another great pairing for marbled rye bread is with a hearty soup or stew. The bread’s dense texture and complex flavor make it a perfect complement to the rich and savory flavors of a warm bowl of soup.
Marbled rye bread also makes an excellent base for a variety of different types of sandwiches. Whether you prefer a classic turkey and cheese or something more creative like a grilled veggie and hummus sandwich, marbled rye bread’s unique flavor and texture will add an extra layer of deliciousness to your sandwich.
If you’re looking for something a bit more indulgent, try using marbled rye bread to make a delicious bread pudding. The bread’s rich flavor and sturdy texture make it perfect for soaking up a custard mixture and baking into a decadent dessert.
No matter how you choose to serve it, marbled rye bread is sure to add a unique and delicious twist to any meal.
Make-Ahead, Storing and Reheating
Marbled rye is a delicious bread that can be made ahead of time and stored for later use. After all, who wouldn’t want to enjoy a delicious slice of this bread anytime they want? Luckily, this bread is easy to store and reheat, so you can enjoy it whenever you like.
To make this bread ahead of time, simply follow the recipe instructions and let the dough rise. Once the dough has risen, shape it into a loaf and place it in a covered container or plastic wrap. You can then store the dough in the refrigerator for up to 24 hours before baking.
If you have leftover marbled rye bread, it’s best to store it in an airtight container or plastic bag. This will help keep the bread fresh and prevent it from drying out. You can store the bread at room temperature for up to 2 days or in the refrigerator for up to a week.
To reheat the bread, you can simply slice it and toast it in a toaster or toaster oven. You can also warm the bread in the oven at 350°F for 5-10 minutes or until warm. If you prefer, you can also wrap the bread in foil and warm it in the oven at 350°F for 10-15 minutes.
One great way to use leftover marbled rye bread is to make a delicious Reuben sandwich. Simply layer sliced corned beef, sauerkraut, Swiss cheese, and thousand island dressing between two slices of marbled rye bread and grill it on a pan or sandwich press.
In conclusion, marbled rye bread is a versatile bread that can be stored and reheated easily. Follow these tips and you’ll be able to enjoy this delicious bread any time you want.
Tips for Perfect Results
Now that you have all the ingredients and steps needed to make the perfect marbled rye bread, it’s important to know some tips to ensure that your loaf turns out perfectly every time.
1. Use bread flour: The high gluten content in bread flour will give your marbled rye bread a perfect structure and texture. It will also help your bread rise better, creating a light and airy crumb.
2. Don’t over-knead the dough: Rye dough is more delicate than other types of dough, and over-kneading it can lead to a dense and heavy loaf. Knead the dough until it’s almost smooth, but still slightly tacky.
3. Let the dough rise in a warm place: Rye dough needs a warm environment to rise properly. Keep it in a draft-free and warm place, around 80°F, until it has doubled in size.
4. Add caraway seeds for an authentic flavor: Caraway seeds are a classic addition to rye bread and give it a distinct flavor. Add them to the dough or sprinkle them on top of the loaf before baking.
5. Use cocoa powder for dark color: If you want a darker color for your marbled rye bread, add cocoa powder to the dark dough. It will give your bread a deep, rich color without affecting the flavor.
6. Roll the dough together gently: When rolling the light and dark dough together, be gentle and don’t press too hard. You want the dough to blend together, but not merge completely.
7. Let the bread cool before slicing: It’s tempting to slice into a freshly baked loaf of marbled rye bread, but it’s important to let it cool completely before slicing. This will ensure that the bread keeps its shape and doesn’t crumble.
By following these tips, you’ll be able to make the perfect marbled rye bread every time. Don’t be afraid to experiment with different variations and substitutions to make the recipe your own. Marbled rye bread is perfect for sandwiches, especially a classic Reuben sandwich. Enjoy!
FAQ
Now that you know how to make this delicious marbled rye bread, let’s answer some frequently asked questions to help you troubleshoot any issues and perfect your results. Don’t worry, I’ve got you covered!
What makes rye marbled?
Let’s talk about Marbled Rye bread, a delightful combination of light and dark rye dough that is either braided or rolled together. The light and dark rye doughs have a similar texture which results in a uniform consistency when baked. It’s worth noting that most rye bread recipes include a small amount of wheat flour in the dough.
What is the difference between rye bread and marble rye bread?
Rye flour is a popular ingredient in Jewish bread recipes, often used to make loaves or bagels. Marbled rye bread is a famous U.S. recipe that combines rye dough with white bread dough to create a unique marbled look. This type of bread is a staple in many households and is loved for its distinct flavor and texture.
Does marble rye taste different?
Marbled rye breads differ from seeded rye breads in that they have a distinct visual appearance, with a swirl of dark brown running through the bread. This is a result of incorporating cocoa powder into the dough during the baking process. However, it’s important to note that the addition of cocoa powder doesn’t make the bread taste like chocolate. Rather, it enhances the flavor profile, providing a rich and robust taste without being overly sweet.
What gives rye bread its distinctive flavor?
When crafting a rye bread, the distinct flavor comes from a blend of rye flour, caraway seeds, and yeast. To give it that tangy taste, an acidic element such as a sourdough culture or vinegar is added to the mix.
Bottom Line
In conclusion, making marbled rye bread from scratch is a fun and rewarding experience for any home baker. The combination of light and dark rye doughs rolled together with caraway seeds creates a striking visual effect and a delicious flavor that is perfect for sandwiches or toasting with butter.
With the right ingredients and a little patience, you can make a loaf of marbled rye bread that rivals anything you can find at a New York deli. So why not give it a try? Impress your friends and family with your baking skills and enjoy the satisfaction of creating something delicious and unique.
Remember to follow the recipe closely, use high-quality ingredients, and don’t be afraid to experiment with the recipe to make it your own. With these tips and tricks, you’ll be well on your way to making the best marbled rye bread you’ve ever tasted.
So go ahead and get baking! I guarantee you won’t be disappointed.
Marbled Rye (Not Abm) Recipe

This is from Peter Reinhart’s magnificent "The Bread Baker’s Apprentice." His description calls for making two 1-pound loaves, either braided or swirled; I got a little goofy and turned it into dinner rolls. (In a household of two people, we need bread that we can successfully freeze!) Mr. Reinhart recommends letting the bread rest for two hours after coming out of the oven so that the flavors will fully develop; we ate ’em about 45 minutes out of the oven, and they were absolutely delicious. (Preparation time does not include rising times.)
Light Rye
- 13 1/2 ounces bread flour (use clear flour if you can get it)
- 6 ounces rye flour (white, if you’ve got it, I used regular rye flour and it was fine)
- 3/8 ounce salt (1.5 tsp. of table salt, but a lot more if you’re using kosher or sea salt)
- 1 3/4 teaspoons instant yeast
- 2 teaspoons caraway seeds
- 1 tablespoon molasses (blackstrap molasses is too strong)
- 2 tablespoons shortening (I used melted butter)
- 11 ounces water, at room temperature
Dark Rye
- 13 1/2 ounces bread flour
- 6 ounces rye flour
- 3/8 ounce salt
- 1 3/4 teaspoons instant yeast
- 2 teaspoons caraway seeds
- 1 tablespoon molasses
- 2 tablespoons shortening (I used melted butter)
- 11 ounces water, at room temperature
- 2 tablespoons cocoa powder (unsweetened, or use carob powder or coffee powder)
- 2 tablespoons water, for dissolving cocoa powder
- MAKE LIGHT RYE: Stir together the flours, salt, yeast, and caraway seeds in the bowl of a stand mixer (or food processor, if you’ve got at least a 4-quart bowl).
- Add molasses, shortening, and 1-1/4 cups water; with paddle attachment of mixer, mix for about one minute at low speed, or until dough gathers up all the loose flour. Add remaining two spoonfuls of water only if needed to form a ball of dough.
- Increase speed to level 2 and knead for four minutes — no more! The rye flour won’t like further kneading. (If kneading by hand, knead for about 6 minutes.) Transfer dough to a lightly oiled bowl, turn dough around so that it’s coated in oil, and cover bowl with plastic wrap. Set aside to rise.
- MAKE DARK RYE: Follow the same procedure to make the dark rye, with the following addition: Blend unsweetened cocoa powder with two tablespoonfuls of water, forming a paste. Add this to the dough when you add the wet ingredients. When finished kneading, add dough to oiled bowl, turn dough over to coat with oil, cover with plastic wrap and set aside to rise.
- Allow dough to rise for approximately 90 minutes, or until doubled in size. Note: If you want to make the dough in the morning for that evening’s supper, you can pop the bowls into the refrigerator and take them out at the appropriate time to finish rising. It may take a little longer than 90 minutes, but it won’t hurt the dough or the finished bread.
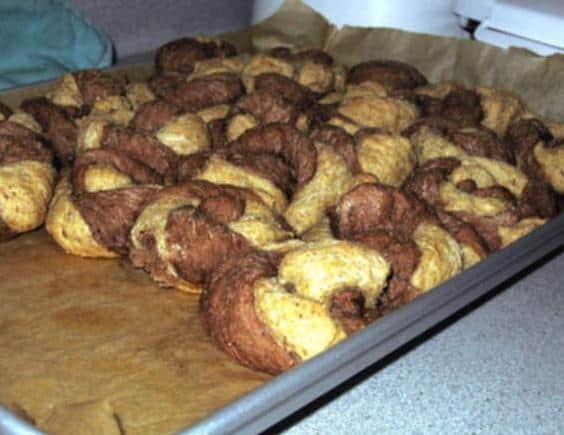
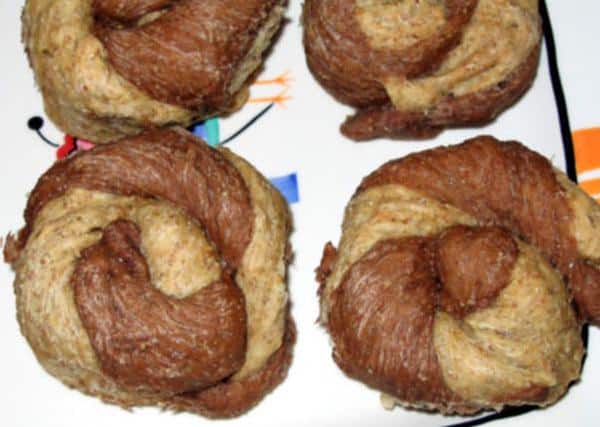
- Shape the bread: Mr. Reinhart recommends making two loaves, either by braiding or swirling. (See his book for directions.) To make the rolls, cut — don’t rip — a piece of dough from both the light and dark ryes; pieces should be maybe twice the size of a ping pong or golf ball. Stretch each ball into a rope approximately 8 inches long, then squeeze the ropes together into one rope. Gently twist the rope, then form it into a pinwheel shape, pinching the outside end of the rope into the bottom of the roll.
- Place rolls on parchment paper on a large baking sheet or jelly roll pan. Allow rolls to touch each other; they’ll easily pull apart later.
- Mist the pan of rolls with oil and cover loosely with plastic wrap. Allow to rise for another 90 minutes, or until nearly doubled in size.
- Note: Here’s another stage where you can delay things, so the rolls will be ready for dinner that night. When the rolls are shaped and in the pan, you can put the pan in the fridge before the dough rises; it can stay there for a day or two, if necessary. Then pull the pan out for the final rise and baking.
- Preheat oven to 350.
- Bake for 20 minutes, then rotate pan. Bake for approximately another 20 minutes, or until internal temperature of bread reaches 190°F.
- When rolls are finished, remove from oven and allow to cool for 1-2 hours before eating. (That’s just so the flavor develops; if you can’t stand it and need to try one while they’re still warm, it won’t hurt a thing!).
[custom-related-posts title=”Recommended Recipes Just For You” none_text=”None found” order_by=”date” order=”ASC”]