Spicy and Savory Chile Pasado Recipe
Welcome to my kitchen, where I am excited to share with you one of my all-time favorite recipes – Chile Pasado. This traditional recipe from Durango, Mexico is full of amazing flavors that will make your taste buds dance with joy.
In this recipe, we use dried Pasado chili peppers, which are sun-dried green chiles roasted and peeled to perfection. This method of preserving green chiles has been used for generations, and it adds a unique smoky flavor to the dish that you won’t find anywhere else.
Chile Pasado is a classic Mexican dish that is known for its rich and spicy flavor. It’s perfect for adding spice to your cooking, and it’s a great way to use up any leftover beef you may have.
I learned this recipe from my mother, Mama Maggie, who is a master in the kitchen. She taught me that the secret to making the best Chile Pasado is to use only the freshest ingredients and to cook it low and slow.
Whether you’re looking for a hearty and satisfying meal for your family or want to impress your friends with a taste of Mexico, this recipe is sure to please. So grab your apron and let’s get cooking!
Why You’ll Love This Recipe
Are you looking for a hearty and flavorful dish that will satisfy your cravings? Then look no further than this Chile Pasado Recipe! This traditional recipe from Durango, Mexico is full of amazing flavors that will leave you wanting more.
What makes this recipe so special is the use of Dried Pasado Chili Peppers, which adds the perfect amount of spice to the dish without overwhelming your taste buds. Plus, the method of preserving green chiles by drying them in the sun is a time-honored technique that infuses the dish with a rich, smoky flavor.
But the star of the show is the beef – tender and juicy, it’s the perfect complement to the spicy chiles. And don’t forget the queso – melted on top of the dish, it brings a creamy and indulgent touch that takes this dish to the next level.
Not only is this Chile Pasado Recipe delicious, it’s also versatile. You can use it as a filling for burritos or tacos, or serve it on its own with some warm tortillas. And if you’re feeling creative, you can even experiment with different types of chiles or meats to make it your own.
So why will you love this recipe? Because it’s a classic dish that’s been enjoyed for generations, and it’s easy to see why. The perfect balance of spice and flavor make it a crowd-pleaser, and the simple ingredients make it easy to prepare. So go ahead, give it a try – you won’t be disappointed!
Ingredient List
Before starting any recipe, it’s important to have all the necessary ingredients. Here’s what you’ll need for this Chile Pasado Recipe:
Main Ingredients:
- 1 pound of beef
- 6-8 dried chiles Pasado (also known as Pasilla chiles)
- 1 can of beef broth
- 1 tablespoon of vegetable oil
- 1 tablespoon of butter
- 1/2 onion, finely chopped
- 2 garlic cloves, minced
- Salt and pepper to taste
Optional Ingredients:
- 1/4 cup of queso fresco
- Fresh cilantro for garnish
You can find dried chiles Pasado in your local Mexican grocery store or online. The beef broth can be substituted with vegetable broth or water if preferred. The queso fresco is completely optional, but it adds a nice creamy texture to the dish. Make sure to have all of your ingredients prepped and ready to go before starting the recipe.
The Recipe How-To
Step-by-Step Guide to Making Chile Pasado
Ingredients
- 5-6 Dried Pasado Chili Peppers
- 2 cups of Water
- 2 tablespoons of Vegetable Oil
- 1 pound of Beef, diced into small cubes
- 1/2 Onion, finely chopped
- 1/4 teaspoon of Salt
- 1/4 teaspoon of Pepper
Instructions
- Preheat your oven to 350°F (180°C).
- Rinse the dried Pasado chili peppers and remove the stems and seeds.
- Place the chili peppers on a baking sheet and roast them in the oven for 5-7 minutes or until they are fragrant.
- Remove the chili peppers from the oven and place them in a bowl with 2 cups of hot water. Let them soak for 15-20 minutes or until they are soft.
- Once the chili peppers are soft, remove them from the water and place them in a blender with 1 cup of the water they were soaking in. Blend until you have a smooth paste.
- In a large saucepan, heat 2 tablespoons of vegetable oil over medium-high heat.
- Add the diced beef and sauté until browned on all sides, about 5-7 minutes.
- Add the finely chopped onion and sauté until translucent, about 3-4 minutes.
- Add the salt and pepper and stir to combine.
- Pour the blended chili paste into the saucepan and stir to combine with the beef and onion mixture.
- Add 1 more cup of water to the saucepan and stir to combine.
- Bring the mixture to a boil, then reduce the heat to low and let it simmer for 30 minutes, stirring occasionally.
- Taste and adjust the seasoning as needed.
Note
- Chile Pasado is traditionally served with rice and beans, or as a filling for tacos or burritos.
- To make this recipe vegetarian, substitute the beef with diced potatoes or another protein of your choice.
- Chile Pasado can be made ahead and stored in an airtight container in the refrigerator for up to 3 days or in the freezer for up to 1 month.
By following these simple steps, you can enjoy a delicious and aromatic beef Chile Pasado that is perfect for adding spice and flavor to your cooking.
Substitutions and Variations
If you’re looking to switch things up or adjust the recipe to your liking, there are plenty of substitutions and variations you can try with this chile pasado recipe. Here are a few ideas to get you started:
– Beef: While this recipe calls for beef, you can easily substitute it with other meats like pork or chicken. You can even try a vegetarian version using mushrooms or tofu.
– Chile Peppers: This recipe uses a combination of dried pasados and fresh green chiles, but you can experiment with different types of chile peppers to get the level of heat and flavor you desire. Try using chile chilaca, pasilla, or even red chile.
– Cheese: The chile pasado con queso is a classic combination, but you can switch up the type of cheese you use. Instead of queso fresco, try using Monterey Jack, cheddar, or even a smoky gouda.
– Method of Preservation: This recipe uses sun-dried green chiles, but you can use other methods of preserving green chiles as well. Roasting and freezing is a popular method, or you can dry them in a dehydrator.
– Caldillo: This recipe also includes a caldillo, which is a type of broth made with tomatoes and spices. You can adjust the spices to your liking or switch up the broth altogether. Try using chicken or vegetable broth instead of beef.
– Region-Specific Variations: This recipe is a traditional recipe from Durango, Mexico, but different regions may have their own variations. For example, in Chihuahua, they may add potatoes or carrots to the chile pasado con carne seca.
Overall, don’t be afraid to get creative and make this recipe your own. With so many variations and substitutions available, the possibilities are endless.
Serving and Pairing
Chile Pasado is a versatile dish that can be served in many different ways. Traditionally, it is served as a main dish with rice and beans, but it can also be used as a filling for tacos, burritos, and enchiladas. For a lighter meal, it can be served on top of a salad or used as a dip with tortilla chips.
To add a bit of freshness to the dish, I recommend serving it with a side of sliced avocados, fresh cilantro, and a squeeze of lime juice. The coolness of the avocado and the brightness of the lime juice perfectly balance the smoky and slightly sweet flavor of the chile pasado.
When it comes to pairing, Chile Pasado pairs well with a variety of beverages. A cold Mexican beer, such as Corona or Dos Equis, is a classic choice that complements the dish’s spicy and smoky flavors. For those who prefer non-alcoholic options, a refreshing glass of horchata or agua fresca is the perfect accompaniment.
Overall, Chile Pasado is a dish that is sure to please any crowd, whether you’re serving it as a main dish or using it as a filling for tacos or burritos. With its complex flavors and versatility, it’s a recipe that you’ll want to make again and again.
Make-Ahead, Storing and Reheating
One of the great things about Chile Pasado is that it can be made ahead of time and stored for later use. In fact, it tastes even better the next day after the flavors have had time to meld together.
To make ahead, simply prepare the dish as instructed and store it in an airtight container in the refrigerator for up to 3 days. When you’re ready to serve, simply reheat it in a pot on the stove over medium heat, stirring occasionally, until it’s heated through.
If you have leftovers, Chile Pasado can also be frozen for up to 3 months. To freeze, let the dish cool to room temperature and then transfer it to a freezer-safe container or freezer bag. Be sure to label it with the date and contents. When you’re ready to enjoy it again, thaw it in the refrigerator overnight and reheat it in a pot on the stove.
One thing to keep in mind is that the longer the Chile Pasado sits, the spicier it becomes. So if you’re sensitive to spice, you may want to adjust the amount of chili peppers you use or simply eat it right away.
Overall, Chile Pasado is a versatile dish that can be made ahead of time and stored for later use. With a little bit of planning, you can enjoy this delicious and flavorful dish whenever you want!
Tips for Perfect Results
Cooking with chile pasado can take some practice, but with these tips, you’ll be able to create a delicious and flavorful dish every time.
1. Choose the right chile pasado: Look for chiles that are plump, shiny, and have a deep red color. Avoid chiles that are dull or have any mold or discoloration.
2. Toast the chiles: Toasting the chiles brings out their rich, smoky flavor. Place them on a hot, dry skillet and turn them frequently until fragrant, about 30 seconds to a minute.
3. Remove the seeds and stems: The seeds and stems can add bitterness to your dish, so be sure to remove them before using the chiles.
4. Rehydrate the chiles: Soak the chiles in hot water for 20 to 30 minutes until they are soft and pliable. This will make them easier to blend and will also help to remove any remaining seeds.
5. Blend the chiles: Use a blender to puree the chiles into a smooth paste. You can add a little bit of water to help the blending process.
6. Use the right amount of chile paste: Chile pasado can be very spicy, so start with a small amount and add more to taste. Remember that the heat will intensify as the dish cooks.
7. Cook the chile paste: Cook the chile paste in oil for a few minutes to deepen the flavor and remove any raw taste.
8. Add the chile paste at the right time: Add the chile paste towards the end of cooking to avoid burning it and to ensure the flavors are well incorporated.
By following these tips, you’ll be able to create a perfect Chile Pasado every time.
FAQ
Now that you know how to make this delicious Chile Pasado Recipe, you may have some questions that need answering. It’s time to delve into some frequently asked questions and clear any doubts you may have. So, keep reading to find out more!
What is chile pasado?
Pasados are a type of green chile that undergo a process of being roasted, peeled, seeded, and dried. These chiles can be revitalized by soaking them in warm water for around 20 minutes, after which they become more flavorful and regain their bright green color. Utilize pasado chiles in dishes such as black bean soup or huevos rancheros by cutting them into strips after rehydration.
What kind of chile is chile pasado?
Chile pasado is a type of green chile that has been charred to remove the skin and then dehydrated. This can be done using a dehydrator or by hanging the skinned chiles in a shady spot with good ventilation. The term “chile pasado” translates to “stale” or “worn” chile.
What can I use instead of chile pasado?
When you find yourself in a bind and run out of chile pasado, there are alternative options that can be used in its place. Roasted poblano peppers or roasted chilacas are both great substitutes that will add a similar depth of flavor to your dish. Keep this in mind as a helpful tip when cooking and experimenting with different recipes in the kitchen.
Is chile pasado spicy?
When it comes to adding a bit of spice to your dishes, you can’t go wrong with Dried Pasado Chili Peppers. These peppers boast a Scoville Scale rating of 500 to 2,500, putting them on the mild end of the heat spectrum. However, what they lack in heat, they more than make up for in flavor. Dried Pasado Chili Peppers have a distinctive smoky taste that adds a unique dimension to any dish.
Bottom Line
In conclusion, if you are looking for a delicious and easy-to-make recipe that is full of amazing flavors, then this Chile Pasado recipe is perfect for you. With its traditional roots in Durango, Mexico, this recipe is a classic that has been passed down through generations. The combination of dried Pasado chili peppers, beef, and fresh green chiles roasted to perfection creates a dish that is perfect for adding spice to your cooking.
Whether you’re making it for your family or serving it at a party, this recipe is sure to impress. And with the tips and recommendations provided in this article, you can be confident in achieving perfect results every time.
So what are you waiting for? Give this Chile Pasado recipe a try and experience the authentic taste of Mexico in your own kitchen. With its unique blend of flavors, this dish is sure to become a favorite for anyone who loves good food. So go ahead and add it to your recipe book, and enjoy the delicious taste of Chile Pasado!
Chile Pasado Recipe
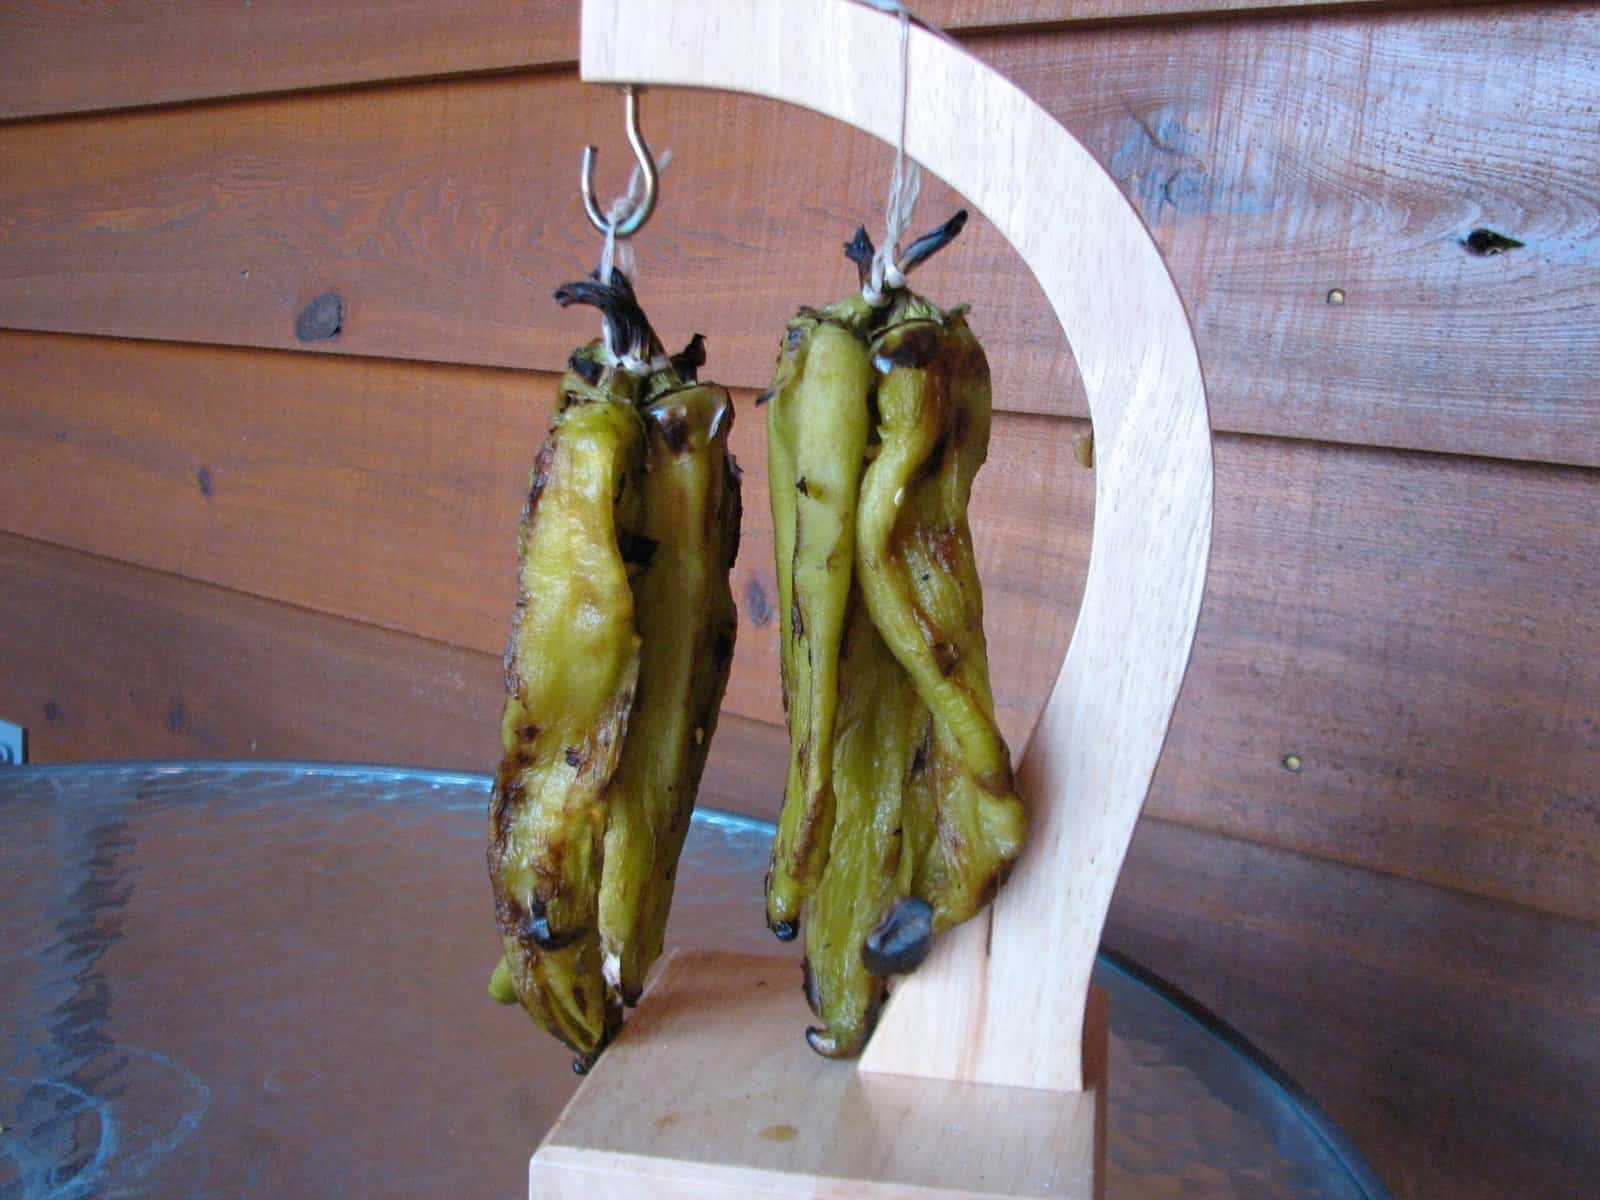
Chile pasado–chile of the past– is sun-dried, roasted and peeled green chile. It was the traditional method of preserving green chile in New Mexico before the advent of freezers. This method assumes that you live in a dry climate like New Mexico or Arizona. If not, remove the stems from the chile and place the pods in a food dehydrator until brittle. You can place them in an oven set at the lowest heat possible, but you must monitor them carefully. There are about 10 medium-sized pods to a pound. Found this recipe on the internet. As you can see I dried my first batch using my banana tree. Time indicated is drying time and keep in mind it will vary with humidity. This method can be used to dry other types of chiles.
- 2 lbs new mexico green hatch chiles (2 lbs. equalis about 20 pods)
- string
- Roast the chile pods on a charcoal or gas grill until the pods blister and start to turn black, turning often.
- Remove them from the grill and place in a plastic bag with a wet paper towel for ½ hour.
- Remove and carefully peel the skin off, leaving the stem and seeds intact.
- Tie four pods together by wrapping string around the stems and place over a line outside in the sun.
- Do not let the chiles get wet by rain, and you can protect them from flies and other insects with by wrapping them lightly in cheesecloth.
- Drying time varies with humidity levels, but dry them until they are very dark and brittle.
- To store, break off the stems and place the dried pods in a zip bag and then place in a second zip bag.
- Place in the freezer for optimum results, especially if you live in a humid climate. Because they are brittle, breaking off the stems will sometimes cause the pods to break into strips and other pieces.
- To reconstitute the pods, place them in a pot of boiling water for 1 minute.
- Remove from the heat and let stand for five minutes.
- Remove from the water and drain. Use them in any recipe calling for green chile in any form except whole pods.